


|
#1
07-25-2010, 01:56 PM
|
||||
|
||||
|
Does anybody know of an easy way to hide the scrolling ticker that appears at the bottom of the screen on channels like ESPN Classic?
I want to replace it with a solid bar and a static message that I can control with my own info, (like if it was a baseball game, the score and the current inning) Basically I want to change the top picture to look like the bottom picture. (getting rid of that annoying ticker) Anybody got any suggestions? 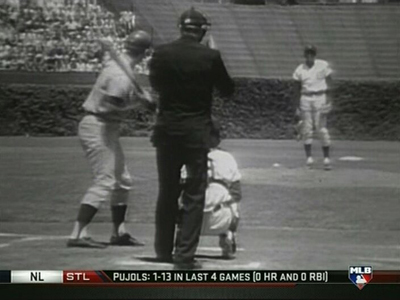 

|


|
#2
07-25-2010, 04:57 PM
|
||||
|
||||
|
Oop. I remember this is one you'd asked me about a while back, and I guess I just plain forgot about it. The perils of PMs and emails. Always best to ask tech on the forum. Anyway...
This isn't what I'd call easy -- intermediate, maybe. If you had wanted to completely remove the ticker... I would have suggested using VirtualDub to crop pixels from the bottom, in pairs (VERY IMPORTANT TO DO TWO AT A TIME!), using a resize filter. In the resize filter, you'd have also used these settings: 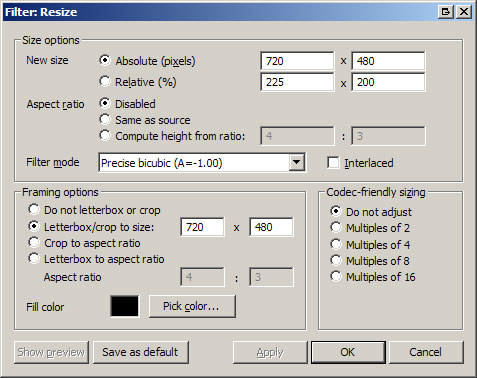 NOTE 1: This assumes your source is 720x480. If you have another resolution, adjust both values to match according. Don't be a dummy and just blindly plug in the values in the image. (I know Joker is no dummy, so this is directed at anybody else reading this.) NOTE 2: The reason you did TWO lines at a time is because the video source is assumed to be a personal recording, therefore interlaced. If your source is progressive, then pairs are not needed. Again, don't be a dummy, use settings that best fit your project. This will re-center the picture. Because the ticker was rather small, there's a good chance you won't even see the crop/re-center on a TV screen. The cropping matte will fall into the overscan, in most cases. You'll save a new AVI file, either HuffYUV lossless or uncompressed, and then re-encode it to a new MPEG in MPEG encoding software. IMPORTANT! If your source video is an MPEG-2 file, use VirtualDubMod or VirtualDub MPEG-2, not the plain VirtualDub. The plain VirtualDub may corrupt the MPEG chrominance interlacing, giving you an inferior video quality. Think of the error as "color mouse trails" on the video. But to completely replace the ticker... You'll need a far more advanced editor. I would use Adobe Premiere 6.5 or Adobe Premiere CS3, because those are what I have for editing. (By choice, not because it came with the computer or some other such silly reason people seem to have. Again, not directed at Joker, as he's no dummy.) The video will be on the timeline as VIDEO 1, and then you'll have to create new graphics in Adobe Photoshop, saved as PSD with transparency. You'll import these into Premiere as alpha layer graphics. Then you'll lay them on top of the video, in VIDEO 2. Tip: When creating the graphics, get yourself a good screen capture using VirtualDub. Not PowerDVD, VLC or some player, as those tend to butcher the video a little bit, even if by just a few pixels -- that's enough to screw you up! Make a new Photoshop file, transparent background, 720x480**, and then paste your screen cap as a new layer. ** Again, this assumes your video source is 720x480. And for Premiere use, it's really suggest you re-convert your video to loss HuffYUV AVI or uncompressed AVI, scaled to 720x480. ... ** AGAIN IMPORTANT! If your source video is an MPEG-2 file, use VirtualDubMod or VirtualDub MPEG-2, not the plain VirtualDub. The plain VirtualDub may corrupt the MPEG chrominance interlacing, giving you an inferior video quality. Think of the error as "color mouse trails" on the video. Resize the PSD to 720x540 (a 4x3 resolution) to edit in WYSIWYG. Make a new layer, then draw in your new ticker, fonts, etc. To get a logo, you can either do a cut-out, or just re-add a new logo. I would re-add a new logo, just in case it changes on the background for any reason. That would make an obvious flaw in your editing. After you're done, save the PSD as-is. Resize it to 720x480. Save that as a new PSD. I suggest name it filename-x480.psd. This is the one you'll import to Premiere. Overlay it into VIDEO 2 timeline track. On older versions of Premiere, hold down the CTRL key on the keyboard then scrub** the timeline to see how it's changed. New ones show the overlay automatically. Computers are faster now, so it doesn't cause lags like it did years ago (and hence the reason it took extra steps to preview). ** scrubbing = moving back and forth in the video, while watching the preview. There's always a marker showing you where you are in the video, at least in the better programs like Premiere. Export as new AVI (to encode to whatever else it is you want to make), or even export as DVD-ready MPEG-2 from Premiere itself. Premiere uses the MainConcept encoder, after all -- one of the best MPEG-2 encoders made. And that's it! Again, not too hard, but not what I'd call "easy" for most. But I'm sure you can do it. I've done this before. The "removal trick" works great for hiding weather alerts. Sometimes I've had to re-encode whole episodes, sometimes just segments of episodes where the news ticker was. (If you have beeping, maps on screen, etc -- forget about it, it's toast.) Same for election results that I've seen scroll the screen during my favorite shows. I use variations on the "replacement trick" for creating advanced motion menus. It involves all of the same basic NLE techniques. So with this, you're learning quite a bit more.
__________________
The LS Collection:. My Cartoon and TV Show List | My Want List | My Future Projects
|

The following users thank lordsmurf for this useful post:
Joker (07-25-2010)
|
|
#3
07-25-2010, 05:03 PM
|
||||
|
||||
|
Note about images in posts...
Please remember to add all images to the forum by attaching them to your post. Read how to do that at http://www.tvpreservation.com/forum/...ement.php?f=21 Nothing aggravates me more than reading posts where images are missing because the person used $hitshack, $hitbucket and Fluckr for their image hosting. Those places delete your photos, graphics and images in time. All of them do eventually. This forum won't. I want to come back in 5 years and see the images still here! That was one of the main reasons we upgraded to the software this site now uses. Thanks! 
__________________
The LS Collection:. My Cartoon and TV Show List | My Want List | My Future Projects
|
|
#5
07-25-2010, 06:10 PM
|
||||
|
||||
|
I just made a few extra notes (in red), so be sure to re-read it.
This guide may also help you in some Premiere basics: http://www.digitalFAQ.com/guides/vid...ere-basics.htm This info will help you do exactly what you want. I don't think there are many Premiere users on this forum, aside from myself and AOA (who isn't active anymore), but I think I see him logged in from time to time. This is somewhat advanced work, compared to what most TV show collectors would do.
__________________
The LS Collection:. My Cartoon and TV Show List | My Want List | My Future Projects
|


